Aug 2026-08-16
Paper wrinkling on a laminating machine is one of the most frustrating production problems. It wastes material, slows down the line, and often requires stopping the machine to clear the jam. But wrinkling rarely happens without reason — it is almost always a symptom of an underlying issue.
The core problem is this: paper wrinkling is not a single-cause failure. It usually results from one or more issues — material condition, tension inconsistency, pressure roller problems, or temperature imbalance. Understanding the specific cause is the key to resolving it quickly.
This article explains the most common causes of paper wrinkling in flute laminating machines, provides a practical diagnostic checklist, and helps you determine when to make adjustments in-house versus when to seek professional support.
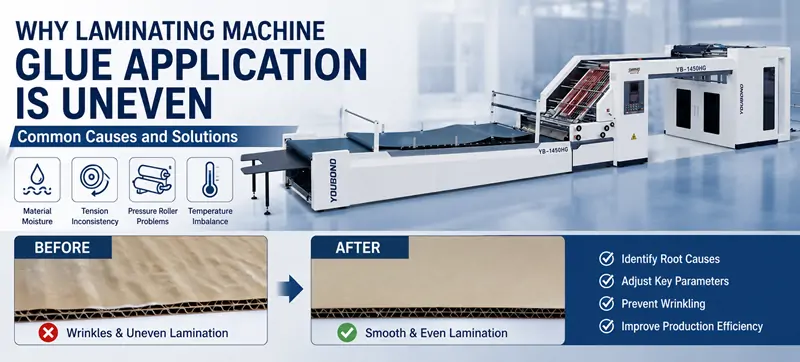
Paper wrinkling can originate from multiple points in the laminating process. Here are the most common ones:
Paper and board are hygroscopic — they absorb and release moisture depending on the environment. When the moisture content is uneven across the sheet, the paper expands or contracts differently in different areas, creating internal stress that manifests as wrinkles during lamination.
Warped or curled boards are another common cause. If the leading edge of the sheet is not flat when it enters the nip, it can fold or buckle under pressure, creating a wrinkle that propagates through the entire sheet.
What to check:
In a flute laminator, wrinkling is often caused by improper machine adjustments rather than tension inconsistency. The most common adjustment-related causes include:
Uneven roller pressure — The pressure rollers (or nip rollers) that bond the face paper to the corrugated board must apply even pressure across the full width. If the pressure is uneven — higher on the operator side than the drive side — the paper will be squeezed unevenly, resulting in creases or wrinkles. Excessive pressure can deform the paper, while insufficient pressure may cause poor bonding.
Incorrect guide roller gap — If the guide roller gap is set too small or unevenly, the paper can be squeezed or forced out of alignment before it even reaches the pressing section, creating wrinkles.
Misaligned conveyor belt or side guide — If the paper is not fed squarely into the machine — due to a crooked conveyor belt or improperly adjusted side guides — the sheet will travel through the machine at an angle. This skew can cause bunching, folding, or wrinkling during pressing.
What to check:
Measure nip pressure on both sides of the press rollers — verify evenness
Check guide roller gaps for proper and even setting
Verify that the conveyor belt is tracking straight and side guides are properly aligned
Uneven or excessive adhesive application is one of the most common causes of paper wrinkling in flute laminators. The adhesive — typically water-based starch glue — contains moisture that the paper absorbs. When too much adhesive is applied, the paper fibers absorb excess moisture, swell, and expand unevenly. As the board dries, the fibers contract, causing internal stress that manifests as wrinkles.
Excessive adhesive quantity — This is particularly problematic with thin face papers (80–120 gsm), where excess glue can soak through and distort the paper surface. As a general reference, water-based adhesive application rates typically range from 3–8 g/m²: coated art paper generally requires 3–5 g/m², while offset paper and white board may need 6–8 g/m². Excessive amounts increase the risk of wrinkling.
Uneven adhesive film — If the glue roller gap is inconsistent across the width, the adhesive film thickness will vary. Areas with thicker glue absorb more moisture and swell more, creating localized wrinkles or "bubbles" that become visible after pressing.
Adhesive buildup — Dried or semi-cured adhesive residue on the glue roller surface creates an uneven transfer pattern, leading to inconsistent coating and localized wrinkling.
What to check:
Verify glue roll gap is even on both sides
Check adhesive application rate — reduce if excessive for the paper grade
Clean glue rollers regularly to prevent adhesive buildup
Paper and board are highly sensitive to environmental conditions. The production environment — both the workshop climate and the machine heating settings — plays a significant role in preventing wrinkling.
High workshop humidity — When the ambient relative humidity is too high, paper absorbs moisture from the air. The edges absorb moisture faster than the center, causing "wavy edges" (or "fluted edges") — a condition where the paper edges become wavy and uneven. Wavy paper cannot lay flat during feeding and pressing, leading to wrinkles. The workshop humidity should generally be slightly lower than the printing workshop to minimize paper deformation.
Excessive drying or heating temperature — Some flute laminating processes use heated rollers or drying tunnels to accelerate adhesive setting. If the heating temperature is too high — typically above 90°C for the heated roller section — the paper fibers lose moisture too rapidly, causing uneven shrinkage. This is especially problematic when the face paper and the corrugated board have different moisture contents; the differential shrinkage creates internal stress and wrinkles.
Temperature variation across the roller width — If the heated roller temperature is uneven — hotter on one side than the other — the adhesive cures and the paper dries at different rates across the sheet. The side with higher heat may cause more shrinkage, pulling the sheet out of alignment and creating diagonal wrinkles.
What to check:
Monitor workshop relative humidity — keep it stable and slightly lower than the printing workshop
Store paper in a climate-controlled environment and allow 24–48 hours to acclimate
If using heated rollers, keep the temperature within the recommended range (typically 70–90°C)
Measure roller surface temperature at multiple points across the width
Verify that heating elements (if equipped) are functioning evenly
The laminating process relies on synchronized speed between the feeding section, the glue application section, and the pressing section. If there is a speed mismatch — even a slight one — the paper can bunch up or stretch, creating wrinkles.
What to check:
If you are experiencing paper wrinkling on your laminating machine, follow this diagnostic process:
| Step | Action | What to Look For |
|---|---|---|
| 1 | Inspect incoming paper/board for warping or curling | Visible distortion before processing |
| 2 | Check moisture content of incoming material | Inconsistent or above 10% moisture |
| 3 | Run a pressure test with carbon paper or pressure film | Uneven pressure pattern across roller width |
| 4 | Measure roller temperature at multiple points | Temperature variation of more than 5°C across the width |
| 5 | Check nip pressure on both sides | Uneven pressure indicates adjustment needed |
| 6 | Verify speed synchronization between sections | Any speed mismatch visible or measurable |
| 7 | Run a test with a different batch of material | If problem resolves, issue is material-related |
If you need professional assistance with diagnosis, YOUBOND's after-sales support team is available to help.
Many wrinkling issues can be resolved through routine adjustments and material handling. However, some situations require professional intervention.
| Issue Type | In-House Fix | Professional Support Needed |
|---|---|---|
| Material moisture / warping | ✓ Adjust storage and acclimation | If material quality is consistently poor |
| Tension adjustment | ✓ If within normal adjustment range | If tension components are worn or damaged |
| Pressure roller adjustment | ✓ Regular nip pressure checks | If pressure cannot be balanced |
| Temperature imbalance | ✓ Check and adjust heating settings | If heating elements need replacement |
| Persistent wrinkling after adjustments | — | ✓ Full diagnostic and repair |
Preventing wrinkling is far more cost-effective than stopping production to clear jams. Use this checklist to maintain wrinkle-free lamination:
This usually indicates uneven pressure or tension. Check nip pressure on both sides — the side with higher pressure or tension is likely the cause. Also check roller parallelism.
Yes, but indirectly. If the adhesive is too thick or applied unevenly, it can create uneven pull on the sheet as it passes through the press section. Uneven glue application causes the sheet to be pulled unevenly, resulting in wrinkles. Check glue roll gap and adhesive viscosity.
For most paper and board grades used in lamination, moisture content should be in the range of 6%–10%, with no more than 2% variation across the sheet. Check with your paper supplier for specific recommendations.
Run the same job with a different batch of material. If the problem persists, it is machine-related. If it resolves, the issue was material-related.
When the roller surface is worn, scored, or has flat spots that cannot be removed by resurfacing. A professional assessment can determine whether resurfacing or replacement is more cost-effective.
Paper wrinkling on a laminating machine is not a random occurrence — it is the predictable result of material issues, tension inconsistency, pressure roller problems, or temperature imbalance. The key to preventing it is regular, systematic inspection and maintenance, combined with proper material handling and storage.
If your laminating machine is experiencing persistent paper wrinkling despite routine adjustments, it may be time for a professional assessment. YOUBOND's technical engineers, each with over 10 years of experience, provide timely solutions to wrinkling and other production challenges.
Review the full range of YOUBOND laminating machine configurations to understand the available options for your production needs. For specific wrinkling issues or technical support, contact our team directly.
GET A QUOTE
 English
 China
China